Why can't I be the type of person that receives their baby shower invite, goes to the store, prints the registry, and shops away? Well, basically, that would be way to easy and it wouldn't require hours upon hours of my time, right? Hmmm.
I guess I just love to create the gift! I love the personal touch. I love the effort it takes. I love that the recipient knows (somewhat) the extent you went to in order to sew/craft the perfect gift just for them!
There is just something special about handmade products. I am SO passionate about this subject that I could scream it from the mountain tops! Not just because I love it, but because I believe there is real value in a hobby. Something that makes you smile or simply just gives you an escape. Whether it is sewing, making jewelry, DIY projects, or quilting - whatever it may be. It's a craft, a love, a passion to pass on to future generations. These are talents that are being forgotten and replaced with phones, computers, and SELFIES!
Now, that I'm off my rant, I thought I would share my latest project in which I am officially in love with. After contemplating my fabric choices and how I could change things up a bit I started scouring the fabric section of JoAnns. I came across a charcoal grey linen and I seriously don't think I can stay away now. I'M IN LOVE folks. I feel that it has a beautiful and classy look to it.
I loosely based the outfit on this tutorial but ended up winging it and adding pants and such.
Size 12-18 Months.
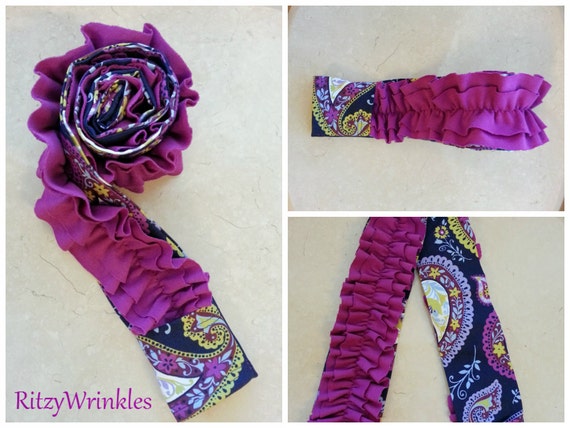
Within the last 6 months or so I have discovered camera strap covers. Now, I don't actually own a camera that this would fit. However, my mother-in-law does and I made her one for her birthday in the summer. She loved it!
So, I found this tutorial and have been making them ever since. You can find a few of my creations in my Etsy shop on the right.
Thought I would share this really great, in depth tutorial if any of you are thinking of making your own! They are so fun, quick to make, and easy to customize. Definitely something the photographer in your life would adore!
I don't know about you but I absolutely adore fabric yoyos. I mean, a yoyo fanatic over here! They are adorable and can add a feminine, finished touch to anything you add them to. They are incredibly versatile. I decorate and embellish so much with yoyos. In fact, last year I made a quilt for my daughter and lavishly adorned her crib blanket with yoyos. I will add a picture of her quilt at the end of this tutorial.
So, without further ado.. "the yoyo," without a fancy plastic template.
First of all, you will need the following supplies: Fabric, needle, thread, a round object (I used a ramekin), pencil/pen, scissors, Fray Check (completely optional), and an iron (optional).
 Trace the perimeter of the round object you are using with a pencil or pen.
 Cut it out, of course.
Here is where you can iron it if you so desire. In my case, I didn't bother. I just went ahead onto the next step.
Cut it out, of course.
Here is where you can iron it if you so desire. In my case, I didn't bother. I just went ahead onto the next step.
 Now, some may say this is a little over board but I am one who makes every effort to create a quality product to ensure my creations last. I use Fray Check around the entire circle to prevent any fraying. Let it dry. If you are adding the yoyo to something that will not be washed then you are probably fine to omit this step. For now though, I take pride in my over achiever status.
 While it is drying - go ahead and thread your needle and knot the end. Or, like I did, go put your child to bed. Kidding, it doesn't take that long to dry. No, really, that was my third attempt at getting her to sleep! She's a fighter ladies.
 Anyways, fold over the edge of the fabric and make your first stitch with your knot on the inside (so it will not be visible).
TIP: The closer the stitches are together the bigger the hole in the middle of the yoyo will be. The longer the stitch is the smaller the hole in the middle.
Choose your preference and start stitching.
Anyways, fold over the edge of the fabric and make your first stitch with your knot on the inside (so it will not be visible).
TIP: The closer the stitches are together the bigger the hole in the middle of the yoyo will be. The longer the stitch is the smaller the hole in the middle.
Choose your preference and start stitching.
 I find to create a consistent length between my stitches, be it short or long, I can go in and out in and out without pulling my needle all the way through. Then once you are comfortable or cannot fit anymore fabric on your needle - pull it all through. This will help with the consistency of your stitches as well as your speed.

 Once you have gone all the way around, start cinching the yoyo as tight as you like.
 Now that you have a beautiful creation, finish it off with a tack. Simply, find an inconspicuous crevice and stitch straight down into the bottom of the yoyo. Then go back up and back down, close to the same spot.
 Now, grab a little bit of fabric with the needle. Do not pull the thread all the way through. Place your needle through the loop of thread and pull tight. I do this twice. Again, I am a little over the top.
 Depending on how big the yoyo is, I find at minimum two other places to tack; all connected via the back.
 Here are a few others I have done.
 Please excuse the horrible lighting and clarity of this picture. My daughters room is not great for picture taking, apparently. I took it out of her crib and got a few more shots to hopefully give you a better idea of what it entails.

 I also like to double them up and make different variations! Swoon.
I hope you found this tutorial helpful. Happy yoyo making!
I also like to double them up and make different variations! Swoon.
I hope you found this tutorial helpful. Happy yoyo making!
Well well.. if it isn't the weird, awkward first post. I'm sure at some point I will look back at this post and simply cringe at how stiff this feels. But, hey, we all have to start somewhere..right? Yeah, well I don't know about you but the bloggers I follow seem like they have been blogging since birth.
So, I am over the top excited to start my blog here at RitzyWrinkles. I have debated starting this blog for at least six months now - and finally here I am! I feel somewhat behind the times as it seems like everyone and their brother have a blog these days. Anyway, enough about my vulnerability and newbie status as a blogger!
Let's take a look into what direction this blog will take us. I adore creating things.. anything in fact. I love sewing and, of course, DIY projects. Tutorials will be a regular and hopefully we can all learn together. I hope I can shed some light on a few things as well as learn a ton from other bloggers and readers. This will serve as a platform to share my faith, life experiences, my family, and my passions..now THAT my friends is a dream blog - and I can only hope that others will join in on my fun!
Here's to the journey ahead!